How to make rtweet R Shiny apps with user credentials
Using 3-legged authentication to avoid twitter rate limits
*[If you just want to see some code that makes it work, click this!]*
rtweet is a fantastic R package from Michael Kearney that lets you get Twitter data using the Twitter API. Shiny is a R package from RStudio that lets you create interactive websites from R. With these two packages you can create all sorts of fun tools in R, like this website by Garrick Aden-Buie that gives you a Twitter year in review. Unfortunately, Twitter puts constraints on the amount you can use their API, referred to as rate-limiting, and if your site gets too popular it’ll suddenly stop working. There is a way you can avoid this, and that’s to have your users authenticate on Twitter while using your site. If Twitter knows which user is hitting their API, then twitter won’t count those hits directly against your site’s rate-limit. It’ll instead count those hits against the users own rate-limit. So by making users authenticate, avoiding the rate-limit will no longer be a concern for your site.
The process of asking users to first log into Twitter before using your site is called 3-legged authentication. If you have a twitter account you’ve probably been asked to authenticate before and you may have not even noticed. It takes some work to set up for a shiny application, but its really worth it!
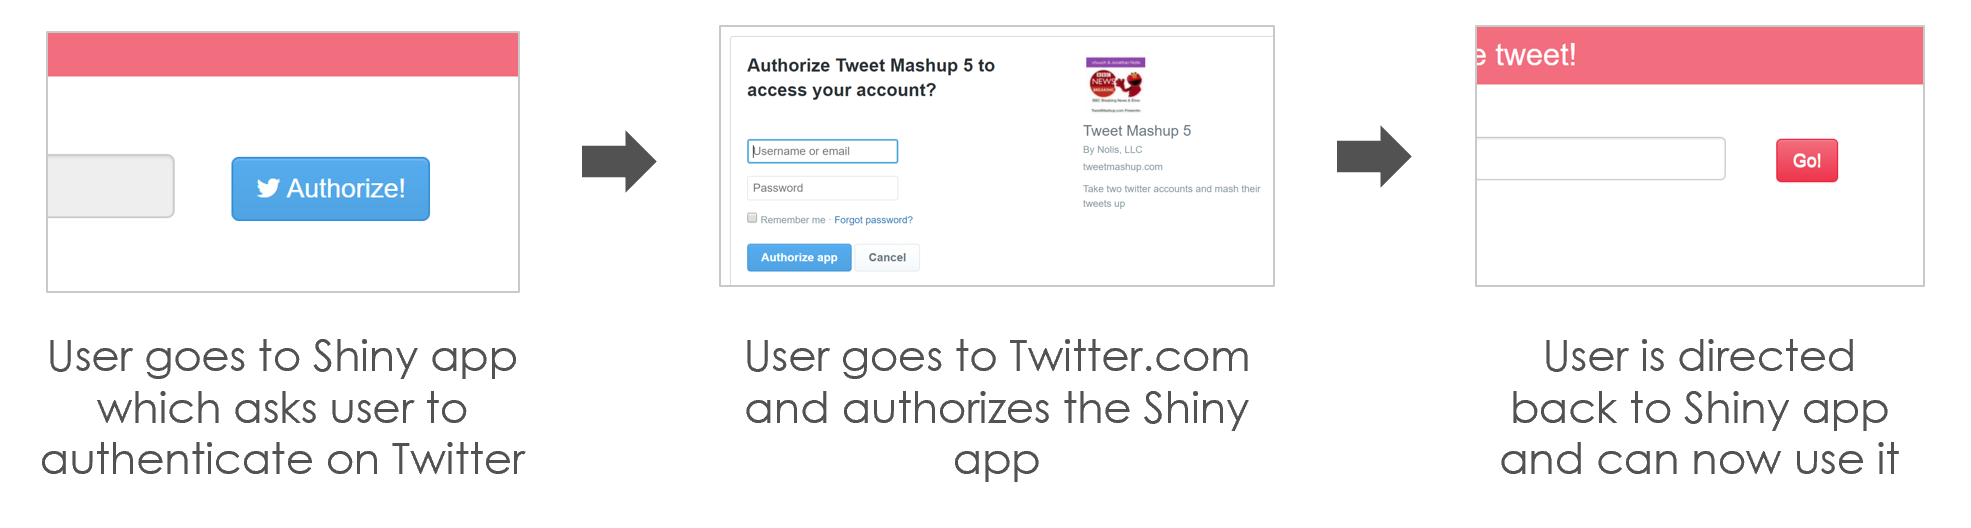 This interface is Twitter asking you to authenticate yourself for the app ' you probably have seen this before and didn’t know it
This blog post is a walk-through of setting up 3-legged Twitter authentication in an R Shiny application that uses rtweet. In a follow up blog post I’ll add the additional step of using cookies to allow the users to stay authenticated even after closing the browser.
How 3-legged authentication works
To make any request from the Twitter API you need four strings that together make a set of Twitter credentials: a consumer key, a consumer secret, an authentication token, and an authentication token secret. When you register a Twitter app, Twitter provides you those four items. However, when you use the app credentials they count against your app’s rate limits. The process of 3-legged authentication gets you, for each user who authenticates, an alternate authentication token and authentication token secret to use. When you use those two strings plus the original consumer key and consumer secret, Twitter knows to use the user’s rate limits instead of the applications. Twitter uses a method of 3-legged authentication that follows the oauth standard, which is nice because that means that the lessons learned here could be applied to other websites beyond just Twitter.
The actual process is as follows. Suppose we have a Shiny app and we wanted to authenticate:
The R application will ask Twitter to generate a “request_token” via an API request. This token will be put into a special URL that when a user clicks will send them to the twitter authentication page. The URL will look something like:
https://api.twitter.com/oauth/authorize?oauth_token=TX7OoQAAAAAA_XMwAAABb7IAFBg
The user will click that URL and go to the authentication page. If the user clicks the “Authorize app” button, they’ll be redirected back to the shiny app, but with the useful information of an “oauth_token” and an “oauth_verifier” in the response URL. The URL that the user gets returned to would look something like this:
http://127.0.0.1/?oauth_token=zxpV2gAAAAAA_XMwAAABb7Iglq0&oauth_verifier=8JjwceyQAcfcAcJLyklHFlNVkKGaKrc8
Finally, the R shiny app will ask Twitter to convert that oauth_token and oauth_verifier into the actual access token and access token secrets that are needed via one last API request. At that point the Shiny application will have the credentials needed to have requests go against the user rate limit instead.
In picture form, the process looks like this
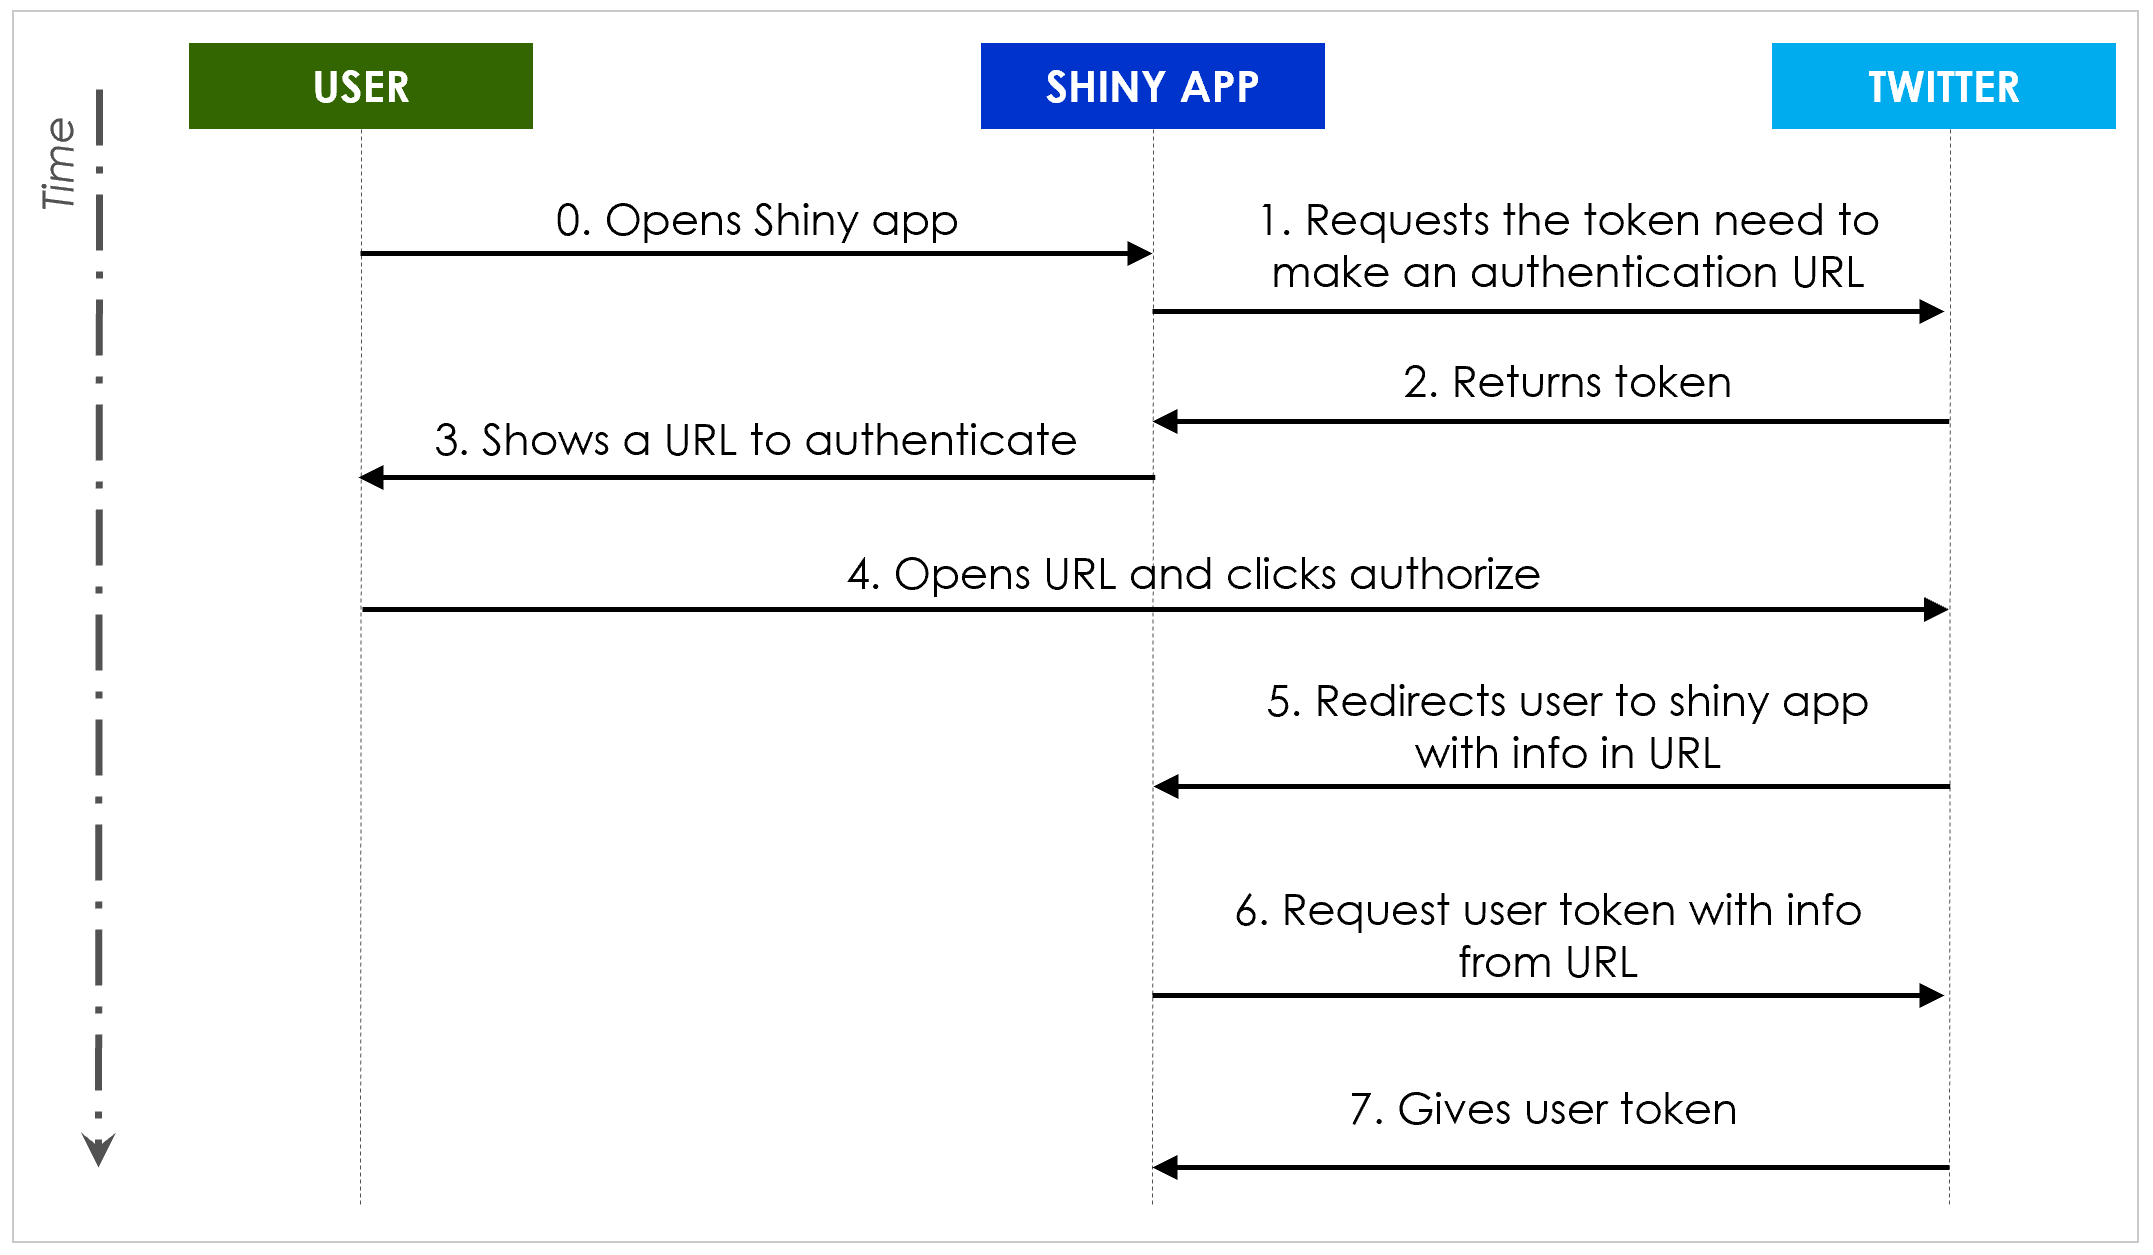 The sequence diagram for the actions that the user, Shiny app, and Twitter take. Software engineering architects just looooove sequence diagrams.
How to do it in Shiny
First, go to https://developer.twitter.com/apps and register a new app. This may take some time before Twitter approves it. Once you have approval, go to the keys page and save the four keys (consumer key, consumer secret, access token, and access token secret). Also on the app page edit the callback urls to include “http://127.0.0.1”. If you do not do this step your app won’t work. You also will want to add any other urls that you might have your shiny application use, such as if you host it on shinyapps.io.
Here is the R code for the steps in this process. Before we start let’s load up the R packages we need:
library(shiny)
library(httr)
library(rtweet)
Let’s also load up the credentials from the Twitter app we made earlier. Replace what’s in the brackets with your own keys.
app <-
    oauth_app(
    app = "",
    key = [CONSUMER KEY],
    secret = [CONSUMER SECRET]
    )
You don’t need the access token or access token secret. You can also store them in a json file and load them with the R package jsonlite (which is what I do in the demo at the end).
Steps 1, 2, and 3: creating the authorization URL
To request the URL that the user will click to authorize the Shiny app with Twitter, we need to call the Twitter API and ask for some tokens. Most of the time you don’t need to call the Twitter API directly (that’s what the rtweet package is for). However, the 3-legged authentication requests aren’t built into rtweet, so we have to write these requests ourselves.
We need a function that creates the signature so that the Twitter API accepts our request. I pulled this function from rtweet and slightly modified it ' it uses the oauth code from the httr package:
oauth_sig <- function(url, method, token = NULL, token_secret = NULL, private_key = NULL, ...){
    httr::oauth_header(
    httr::oauth_signature(url,
                            method,
                            app,
                            token,
                            token_secret,
                            private_key,
                            other_params = list(...)))
}
And then here is the function to create the URL for the user to click. It does a HTTP request to Twitter to get a request token. It then processes the response of the request to turn it into the URL. The method for how it does this processing (taking the response and turning into part of the URL query) is straight from the Twitter API documentation.
get_authorization_url <-
    function(app, callback_url, permission=NULL){
    private_key <- NULL
    response <-
        httr::POST(
        "https://api.twitter.com/oauth/request_token",
        oauth_sig(
            "https://api.twitter.com/oauth/request_token",
            "POST",
            private_key = NULL,
            oauth_callback = callback_url)
        )
        httr::stop_for_status(response)
        params <-
        httr::content(
            response,
            type = "application/x-www-form-urlencoded")
        authorize_url <-
        httr::modify_url(
            "https://api.twitter.com/oauth/authenticate",
            query = list(oauth_token = params$oauth_token,
                        permission = permission))
        authorize_url
}
Then, if you run:
url <- get_authorization_url(app, "http://127.0.0.1")
You would generate a URL that you could click on and it would take you to the Twitter authentication page. When you authorized the app, it would return you to “http://127.0.0.1/?[the credentials the app needs]”. If you failed to set “http://127.0.0.1” as a callback url on the Twitter developer app website then this step will fail.
Step 4: user clicks the authorization URL
To serve that authorization url in Shiny app you can just use a HTML link
a(href = url, "Authorize this app")
After the user clicks the link and authorizes the app, we can finish it.
Steps 5, 6, and 7: retrieving the user tokens
As stated before, when the user authorizes the app they’ll be sent back to your shiny app with the information you need in the url:
http://127.0.0.1/?oauth_token=zxpV2gAAAAAA_XMwAAABb7Iglq0&oauth_verifier=8JjwceyQAcfcAcJLyklHFlNVkKGaKrc8
There are two components here, an oauth_token and an oauth_verifier. You can retrieve them within your shiny app by using the session component of the server function.
server <- function(input, output, session) {
    ...
}
That “session” variable has the url properties of how the user got to the app:
query <- getQueryString(session)
Now query$oauth_token and query$oauth_verifier have the two properties we need. The following function will take the app information, oauth_token and oauth_verifier and get the user tokens from them. It does another HTTP request to Twitter to get the tokens, and if the request was successful (it has HTTP status 200) then the response has the users token. The response also has the user name and ID, but you may want to consider anonymizing it:
get_access_token <-
    function(app,
            oauth_token,
            oauth_verifier){
    url <-
        paste0(
        "https://api.twitter.com/oauth/access_token?oauth_token=",
        oauth_token, "&oauth_verifier=", oauth_verifier)

    response <-
        httr::POST(url,
                    oauth_sig(url,
                            "POST",
                            private_key = NULL))

    if(response$status_code == 200L){
        results <-
        content(
            response,
            type = "application/x-www-form-urlencoded",
            encoding = "UTF-8")

        # since storing the username might be creepy
        results[["screen_name"]] <- NULL

        # since storing the user id might be creepy
        results[["user_id"]] <- NULL

        results
    } else {
        NULL
    }
}
And so by calling the get_access_token function you get what you need to make a valid set of user credentials
access_token <-
    get_access_token(app, query$oauth_token, query$oauth_verifier)

user_token <- create_token(app="",
                    keys$consumer_key,
                    keys$consumer_secret,
                    access_token = access_token$oauth_token,
                    access_secret = access_token$oauth_token_secret)
And that’s it! You now have credentials for the user and not your app.
Step 8: Enjoying the fruits of your labor
With this user token you can make any rtweet call you want. For example, you could get the text of 3 tweets the user recently made:
tweets <- get_my_timeline(token = user_token)$text[1:3]
With these tools we can make a whole Shiny app! Here is the code for an example app that has an authorization link, and once you click it shows three recent tweets from the user. To run the app make sure you use the command
runApp(port=80L, launch.browser=FALSE)
And go to http://127.0.0.1 in your browser. You need to use the right port and the desktop browser for the redirect to work.
Next steps
Unfortunately, if the user refreshes their browser then Shiny will delete the user token and it won’t work. It would be much better if a user could log in once and then never have to do it again. The good news is that it’s possible! The bad news is that it requires using browser cookies, which requires a bit of engineering since Shiny doesn’t have built-in support for it. In a followup post I’ll work through how to do that!